~/contents
I recently picked up a few Arduino clone boards from Tenstar Robot. I found tinkering with GPIO is much more convenient with a microcontroller, which can be quickly programmed and reset, and I really enjoyed working with these boards. These microcontrollers are based on the ATmega328P and cost about $4 and $3 respectively. They’re so inexpensive you can purchase several at once, and then if you fry something you don’t have to wait for a replacement.
Uno R3
The Uno is a 14-pin board with USB/CH340G, barrel jack, and reset button, with 32KB flash memory. It supports PWM on 6 pins. Tenstar Robot sells multiple versions of the Uno clone with different USB connectors, which is convenient. I purchased the black board with a micro-USB and it was plug and play. Arduino boards generally accept 7 to 12V and the pins output 5V. Arduino uses a variant of C++ (sometimes called Arduino C) that has some useful baked-in functions. The board has female connectors and all the pins are labelled, making it easy to work with as a development board. These are extremely popular boards with a huge ecosystem, so it is easy to find libraries, resources, nice pinouts (I like pighixxx’s).
To get started, install the Arduino IDE and load an on-board LED sketch to test.
File > Examples > 1.Basics > Blink. Tools > Board menu that corresponds to your model � Arduino Uno in this case. Tools > Port Upload
Once you have blinky, you might want to stop it. Start a new project and upload the empty project.
Serial Debugging
Tools > Serial Monitor
This allows debugging via the Serial.print command. Initialize serial mode in the setup function and use at will in the loop or elsewhere:
Serial.begin(9600);
...
Serial.print("Number of button presses: ");
Serial.println(buttonPushCounter);
Port Manipulation
An option for faster digital I/O is port manipulation. Some of the pins are grouped into ports, and these can be manipulated by modifying the port register. If I wanted to use digitalWrite to turn LEDs on and off, this can be useful. It cannot be done with analogWrite, so you cannot use it if you need PWM unless you rewrite the function.
Uno Will Not Reboot Properly
After a while I ran into an issue where my Uno would not automatically restart after a power-down and reflashing the bootloader did not resolve the issue. To get the sketch to run I had to upload it again. This is a known issue with some clones, notably Due R3.
Nano 3.0
The Nano is a smaller form-factor ATmega328P board that shares the same specs as the Uno. The clones typically come without headers so the board can be soldered to fit on a breadboard. This particular board has a USB Mini-B (not to be confused with the Micro USB-B, as I did when I ordered these, you can get both). According to the seller the Tenstar clone accepts 3.3V to 10V external power supply, which is different from the standard Nano (7 to 12V). The Nano does not have auto-reset like the Uno, so you need to manually reset the board each time you upload a sketch.
I strongly recommend ordering an Uno or a programmer along with the Nano in case you run into issues. My boards were advertised as having a bootloader but I had to reflash. The seller provides a schematic but there isn’t a datasheet, which ended up being an issue.
While the Uno clone was painless to set up and use, the Nano clones took some fiddling. It turns out many people have issues with these CH340 clone boards, usually because the drivers need to be updated or there isn’t a bootloader. My drivers were up to date but I could not upload sketches or burn a bootloader. Fortunately, you can use an Uno to program and burn a bootloader to the Nano. This requires soldering ISCP pin headers.
FTDI
FTDI - Nano
RX > TX
TX > RX
GND > GND
VCC > 5V
Nano can be programmed using an FTDI module. As soon as the sketch begins uploading hit the reset button on the board. There may be situations in which you cannot hit the rest button, and there are wiring examples online that demonstrate how to enable auto-reset for FTDI programming by putting a 0.1uf (100nf) capacitor between the Nano’s reset pin and DTR, as well as a 10k resistor between the capacitor and VCC. This wiring should be correct but I was unable to auto-reset this particular board successfully. The above method with manual reset worked fine.
Burning a Bootloader - Uno to Nano
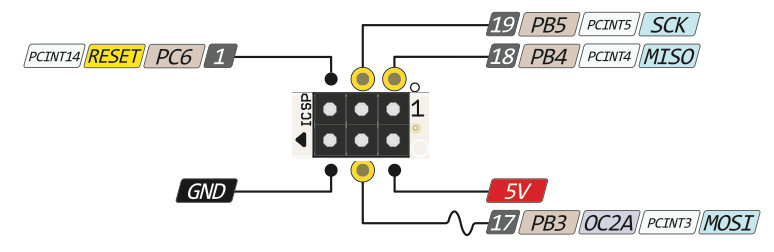
Upload the Arduino ISP to the Uno (File > Examples > Arduino ISP). The 6 ISCP pins at the top of the Nano need to be connected to the corresponding digital pins on the Uno.
 (Image credit: CC-BY-SA bq.com)
Nano Pin 1 (MISO) > Uno digital pin 12 (MISO)
Nano Pin 2 (5V) > Uno 5V
Nano Pin 3 (SCK) > Uno digital pin 13 (SCK)
Nano Pin 4 (MOSI) > Uno digital pin 11 (MOSI)
Nano Pin 5 (RST) > Uno digital pin 10 (SS)
Nano Pin 6 (GND) > Uno GND
Plug the Uno into your PC, then select the Nano as the current board.
Tools > Board > Arduino Nano Tools > Programmer > Arduino as ISP Tools > Burn Bootloader
Ideally, that’s it, but a lot of users have issues beyond that point. I got the error: “Could not find USBtiny device (0x2a03/0x49). Error while burning bootloader,” because I wasn’t reading carefully enough and set the programmer as ArduinoISP. After that, I got a bootload failure error.
Arduino: 1.8.7 (Windows 8.1), Board: "Arduino Nano, ATmega328P"

avrdude: stk500_getsync() attempt 1 of 10: not in sync: resp=0x15

avrdude: stk500_getparm(): (a) protocol error, expect=0x14, resp=0x14

avrdude: stk500_getparm(): (a) protocol error, expect=0x14, resp=0x01
avrdude: stk500_initialize(): (a) protocol error, expect=0x14, resp=0x10
avrdude: initialization failed, rc=-1
         Double check connections and try again, or use -F to override
         this check.

avrdude: stk500_disable(): unknown response=0x12
Error while burning bootloader.
I double-checked my connections, restarted the Arduino IDE, reset both boards, and tried switching Tools > Board > ATmega328P (Old Bootloader), but none of these resolved the issue. Fortunately, Nick Gammon’s Atmega bootloader programmer fixed the problem. Upload the bootloader sketch to the programmer board (in this case, the Uno) and make sure Tools > Board points to the programmer. Hook up the programee (the Nano) via ISCP. Open Serial Monitor with baud set at 115200 and follow the instructions. It took the Uno about 1 minute to flash the Nano. I was subsequently able to upload the example blink program and flash the onboard LED.
Nick Gammon is an apparently amazing individual who provides a wealth of information about Arduino boards, including detailed information on running a low-power board.
At one point I thought the Nano wasn’t properly resetting because my serial monitor wasn’t displaying new data. I figured out I had to close and reopen the serial monitor. So if you’re relying on the serial monitor instead of an external indicator try that before you start troubleshooting.
Burning a Bootloader - Nano to Uno
I had an issue where I needed to put a bootloader on my Uno with a Nano. The above method worked with the following connections:
Nano to Uno
10 >  Reset
11 >  11
12 >  12
13 >  13
GND >  GND
5V > 5V
Replacing the Protection Diode
 It’s only a matter of time before the intrepid maker blows out the protection diode on an Arduino. Symptoms include magic smoke or a discernible bump on the B2 diode, followed by issues with PC-USB detection. I didn’t have any clear physical symptom, but at some point I briefly swapped VCC/GND on a circuit and my PC stopped recognizing one of the Nanos; when I checked the voltage, I found that I could only measure about 2.4 volts from the 5V pin via USB versus 5V when powering the board on VIN. In Arduino Nano Short Circuit, Damn, Hack.Leonetta helpfully advises the B2 diode can be removed and some users report replacing it with 1N4002. I ended up replacing mine with a through-hole 1N4007 diode, which is what I had on hand. Desolder the B2 SMB. Trim the diode leads and tuck them under, then solder to the pads. I was pleasantly surprised by how easy it was.
Resoldering the USB
Also only a matter of time before the maker accidentally rips off the mini-USB. I was able to resolder this at the four corner points, however, the five surface mount connectors were much too small to resolder. I think for a short time I was able to program the Nano via USB, but as of this writing the device is no longer detected via USB and does not receive enough power via USB for operation. It must be programmed serially and requires power to VIN, which must be at least 6 volts. I confirmed 5V to VIN is too low for stable operation, I measured about 4 volts from the 5V pin.
Reducing Arduino Power Consumption
Any sort of battery-powered indication benefits from reducing consumption as much as possible. Generally speaking, we would use a board like the Uno for development and switch to a smaller board for deployment. The Arduino Pro Mini is probably a better choice because it does not have a USB chip (see madcoffee’s Arduino Low Power post), but there are simple things we can do to reduce the Nano’s consumption. liuzengqiang’s Using Arduino Nano for battery-powered projects is quite helpful. Two quick fixes for reducing power consumption for the Nano are disabling the onboard power LED by removing the resistor alongside it and replacing the onboard linear regulator on the underside of the board. They recommend a 5V DC-DC boost converter so you can power the board with 2 AAs. Additionally, consider rocketscream’s Low Power library. 9V batteries are notoriously inefficient, most people use a LiPo, AAs, or coin cell. For monitoring/sensor type devices a sleep/wake cycle can be implemented.
Thoughts on Different Brands
The specs on the Tenstar Robot boards appear to be slightly different than the official Arduino boards (for instance, they list input voltage as 3.3 to 10V, rather than 7 to 12V, but my testing confirmed 5V was inadequate). I never did track down the datasheets online and the seller did not respond to my request for datasheets. The Uno is great but I’ve had USB issues with both Nanos and both required bootloaders. I have also tried RobotDyn Nano boards, these also have different input voltage (6 to 9V) and I accidentally fried one when I applied an unregulated 12V power supply to a RobotDyn I/O Wireless Shield (6 to 12V input). The Robotdyn boards also require bootloaders. I have not put them through the paces yet, the only issue so far is Robotdyn board have some different components that cover the edges where the silkscreen would normally be, so some of the pins aren’t labelled and I have to consult my pinout diagram.
As for my first experiences with a microcontroller in general, after struggling to build an LED chaser the old school way, with ICs and a 555 timer, implementing it on the Uno was comically trivial using Starting Electronic’s Dual LED Chaser tutorial, as was setting up a rainbow LED driver. So while you can obviously learn a lot working with ICs alone, an inexpensive microcontroller can greatly simplify matters. Arduino has a solid ecosystem and the clone price points are hard to beat. The main issue is going to be a low-power setup, the USB and LEDs increase power consumption. You can actually get the bare ATmega328P chip for a bit less than the development board, which isn’t the case with chips like the ATTiny85, so if you know what you’re doing you can dispense with the extra peripherals altogether.