~/contents
This process has convinced me of the importance of documenting failure. So I will write about what didn’t work, and then what did work.
Etching with Vinegar and Hydrogen Peroxide
I first attempted to etch copper clad boards with a 50/50 mix of vinegar and hydrogen peroxide. This method was appealing because it used inexpensive household chemicals and was safer than the more commonly used acids. I polished the boards with fine steel wool until they were shiny, then washed with soap and water, then washed again with isopropyl alcohol or acetone to remove any oils from fingerprints, etc. I found the two to be interchangeable.
Next, I used a Sharpie black permenant marker to draw my traces. I also experimented with clear nail polish and acrylic paint. As far as the vinegar experiments went, the nail polish suvived the etching process best but was the hardest to draw with. The other benefit of nail polish is you can clearly see the copper traces during the process, so you can more easily tell if they are being etched due to overexposure. I used blue tape to mask off the back of the plate.
After the 3rd failed board I began testing small copper clad scraps and had refined my process down to a mixture of 50/50 cleaning vinegar (6%) and hydrdogen peroxide (3%) with copious amounts of table salt (without iodine). Typically, I would drop the board in, add salt to start fizziness, regularly wiping the board with a sponge brush, and continue adding salt as needed. When salt stopped activating I would try adding more vinegar and HP. My final attempt I even warmed up the vinegar in the microwave and gently agitated the mixture while wiping the board with a sponge.
The end result was always the same. The solution would etch the board to a salmon pink color and the etchant would turn bright blue, then the reaction seemed to stop, no matter how much I refreshed the liquids or added salt. Eventually the etch-stop (usually marker) would begin to dissolve. After removing the etch-stop with acetone or alcohol, conductivity tests confirmed the boards still contained too much copper and the traces were not isolated.
This drove me slighly crazy. Why was this process working for everyone but me? Then I found Fluxed Matter’s posts about similar difficulties and felt a little better. In the end, I had a batch of crusty blue tools, several containers of bright blue liquid that needed to be properly disposed of, and a small pile of gunky boards. This etching solution must be properly disposed of because the dissolved copper is toxic. I tossed in almuminum foil balls, which turned a brown coppery color, until the liquid was clear. I chucked some baking soda in there as well. I disposed the aluminium, tools, and dark sediment in the trash and filtered and disposed of the liquid. If you have time, you can allow the liquid to evaporate.
Having no experience with PCB etching or knowledge of chemistry, it’s difficult to say what went wrong here, but I felt like I did my due diligence and it was time to move on.
Additional Reading on this method:
- http://quinndunki.com/blondihacks/?p=835
- http://www.stefanv.com/electronics/etching.htm
- http://tinkerman.cat/pcb-etching-at-home-using-vinegar/
- https://hackaday.com/2012/02/15/etching-pcbs-with-vinegar/
Etching with Muriatic Acid and Hydrogen Peroxide
My next attempt was with muriatic acid, which is hydrochloric acid commonly used in swimming pools. It is cheap (I got a quart for $6 at the hardware store) and I read I could use it to create a regenerative cuperic chloride solution that didn’t have to be recycled. It was my hope I could etch boards in several minutes with a minimal amount of toxic materials. I wasn’t thrilled about having to handle toxic chemicals at all, but the fact that this etchant could be recycled indefinitely was a big plus. There are a number of references on using the above two chemicals, in conjuction with a copper clad board, to create cuperic chloride. Cuperic chloride is regenerative, which is why it is widely used in industry PCB manufacturing.
This etchant should be handled outdoors because of the fumes. Keep it away from sinks, metal, etc. You should wear protective gloves, long sleeves, and eyewear. My research indicates nitrile and latex gloves are both safe. It is important to add the muriatic acid TO the hydrogen peroxide, and not vice versa. So, add the chemicals to a glass container in this order:
2 Parts Hydrogen Peroxide (3%) 1 Part Muriatic Acid (31.45%)
The etchant should eat the copper quite rapidly, turning the mixture green. My first test etched in less than five minutes in a chilly garage and all the traces were good except one of the small ones. It was cheap, easy, and fast. The test will be seeing if I can get it to regenerate, but so far, this has been much easier than my previous attempts with vinegar.
My first 3x4" board, which was masked, was completed in about 12 minutes. It took 7 minutes for the edges of the board to become visible. Since then it has progressively taken longer to etch each board, which are all the same size and design. Agitating the mixture makes a huge difference; if I let it sit, it takes much longer to etch. Adding a little hydrogen peroxide seems to give it a boost.
I read the green color will deepen as you continue to use the etchant and it will eventually turn brown, which means it needs to be regenerated either by airation or adding more hydrogen peroxide. Since adding HP will dilute the etchant airation may be preferable. As it becomes harder to restore the green color you will need to top it off with more muriatic acid. If the volume becomes too large you can allow some of it to evaporate off. I have also read people having trouble regenerating their etchant, however, so we shall see.
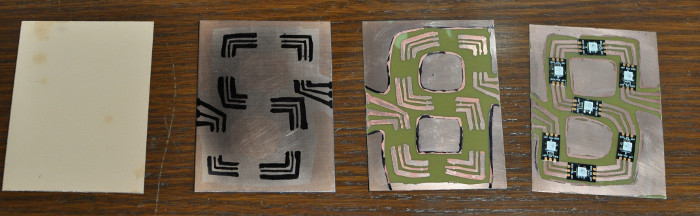
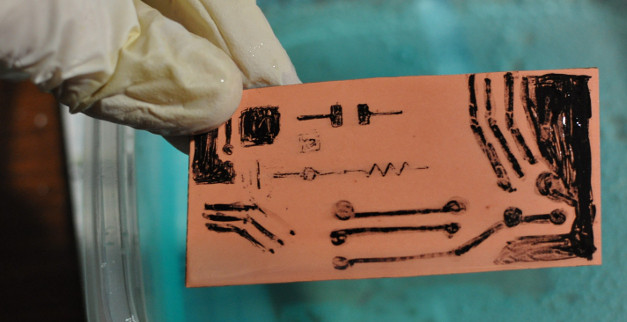
10/30
Today I finished up the 7-segment boards and etched my first drilled PCB. The picture illustrates what the boards look like at each step. I found I could cut the copper clad in half easily with a box cutter and ruler in about four passes. Then, sand the edges and polish as usual. I drilled the holes before etching. My dremel didn’t have a collet small enough, so I used a power drill and the smallest drill bit I had, which was 1/16". This worked okay except the drill left copper strands that needed to be sanded off with steel wool. The holes ended up being about twice as big as I needed, so when it was time to solder I had gaps that were challenging to fill. I also found that I was drawing the traces too close togther and I should make life easier for myself by spacing them farther apart.
I made a fresh batch of etchant. It took longer to etch the boards, but it’s also colder outside now.
11/06
I needed to etch a small circuit board today. This time I put the existing etchant in a glass jar with a lid and shook it until the process finished, it took about 15 minutes (this was a very small board however). My etchant has turned a much darker green that was almost brown. Some people report using bubblers and other devices to aerate etchant but I wanted to try a passive approach. I put an open container in a safe spot on my bench to allow evaporation. After that, I should be able to add peroxide to rejuvinate it.
11/09
After several days the etchant is turning back to a light green color. So if you have a few days, no bubbler needed. It’s not turning bright green like Adam Seychell’s Etching with AutoRegenerated Acide Cupric Chloride Cu1+ color chart shows, it’s more of a Listerine-type green/blue color.
Additional resources:
- http://techref.massmind.org/techref/pcb/etch/CuCl2.htm
- http://users.monash.edu.au/~ralphk/etching-pcb.html
- https://www.instructables.com/id/Stop-using-Ferric-Chloride-etchant!--A-better-etc/
- https://mad-science.wonderhowto.com/how-to/create-pcb-etchant-automatically-improves-after-each-use-0135192/
- https://hackaday.io/project/19898-make-your-own-pcb-etchant/details